How to Properly Fit and Adjust Your Backpack for Maximum Comfort: A Complete Step-by-Step Guide

A properly fitted backpack can transform your hiking experience from painful endurance to pure enjoyment. Whether you're carrying a lightweight day pack on a local trail or shouldering a fully loaded expedition pack for a multi-week adventure, proper fit and adjustment are crucial for comfort, safety, and hiking performance.
Many hikers unknowingly suffer through uncomfortable pack experiences simply because they've never learned how to properly fit and adjust their backpack. Poor pack fit can lead to shoulder pain, back strain, hot spots, numbness, and overall hiking misery. Conversely, a well-fitted pack distributes weight efficiently, moves naturally with your body, and allows you to focus on the trail ahead rather than discomfort.
At Alpenglow Gear, we've helped countless hikers achieve perfect pack fit across our entire range of hiking and camping packs. This comprehensive guide will walk you through every aspect of backpack fitting, from initial measurements to fine-tuning adjustments, ensuring your next adventure is as comfortable as possible.
Understanding Your Body Measurements
Before diving into pack adjustments, you need to understand your body's key measurements that determine proper backpack fit. The most critical measurement is your torso length, which differs significantly from your overall height and determines which pack size will fit your frame correctly.
Measuring Your Torso Length
To measure your torso length accurately, you'll need a friend's assistance and a flexible measuring tape. First, tilt your head forward and locate the prominent bone at the base of your neck (C7 vertebra) - this bony protrusion becomes more pronounced when you look down. Next, place your hands on your hips and locate your iliac crest, the top of your hip bones where a properly fitted pack's hip belt should rest.
Have your friend measure the distance between these two points along the curve of your spine. This measurement, typically ranging from 15-22 inches for adults, determines your torso length category. Most backpack manufacturers offer size ranges like small (15-17"), medium (17-19"), and large (19-22"), though specific sizing varies by brand.
Understanding Body Shape Variations
Beyond torso length, consider your shoulder width, hip shape, and overall build when selecting a backpack. Some manufacturers offer women-specific designs that account for typically shorter torsos, narrower shoulders, and different hip contours. These packs aren't just smaller versions of men's packs but feature entirely different geometry to match female anatomy.
For young adventurers, kids packs require special consideration, as children's proportions differ significantly from scaled-down adult measurements. These packs feature appropriate capacity limits and simplified adjustment systems suitable for developing bodies.
Pre-Fitting Preparation
Before attempting to fit your backpack, proper preparation ensures the most accurate results. Load your pack with the approximate weight you'll typically carry - using actual gear when possible rather than random household items. Different items distribute weight differently, so realistic loading provides the most accurate fitting experience.
For day packs, load 15-25 pounds of typical day hiking gear including water, food, extra layers, and safety equipment. Multi-day packs should be loaded with 35-50 pounds, while expedition packs may require 50+ pounds to accurately assess their carrying performance.
Pack loading technique matters significantly for proper fit assessment. Place heavier items close to your back and in the middle portion of the pack, with lighter bulky items toward the outside and bottom. This loading strategy centers the pack's weight close to your body's center of gravity, improving balance and reducing strain.
Step-by-Step Fitting Process
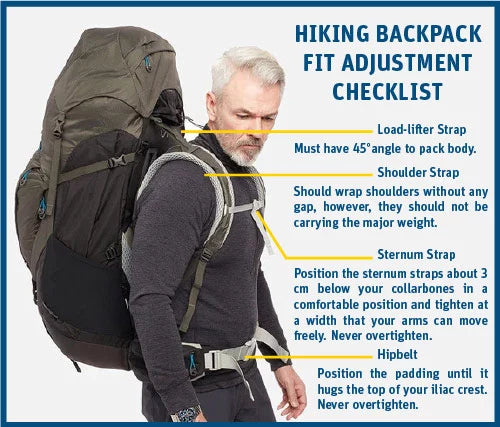
Step 1: Hip Belt Positioning and Adjustment

The hip belt carries 80-90% of your pack's weight, making it the most critical component to fit correctly. Position the hip belt so it sits directly on your iliac crest (hip bones), not on your waist. The belt should wrap around your hips snugly but not constrictively - you should be able to breathe comfortably and move naturally.
When properly positioned, the hip belt's padding should cover your hip bones completely, with the belt buckle centered on your stomach. The belt should feel secure without creating pressure points or pinching. If the belt rides up onto your waist or slides down below your hip bones, the pack's torso length may be incorrect for your body.
For packs with adjustable hip belts, ensure the belt can be tightened sufficiently while still allowing 2-3 inches of adjustment room on each side. This extra room accommodates clothing variations and natural body changes throughout long hiking days.
Step 2: Shoulder Strap Adjustment
With the hip belt properly positioned and secured, focus on shoulder strap adjustment. The shoulder straps should curve naturally over your shoulders without creating pressure points on your neck or underarms. When properly adjusted, the shoulder straps should feel snug but not tight - they're primarily for stability rather than weight bearing.
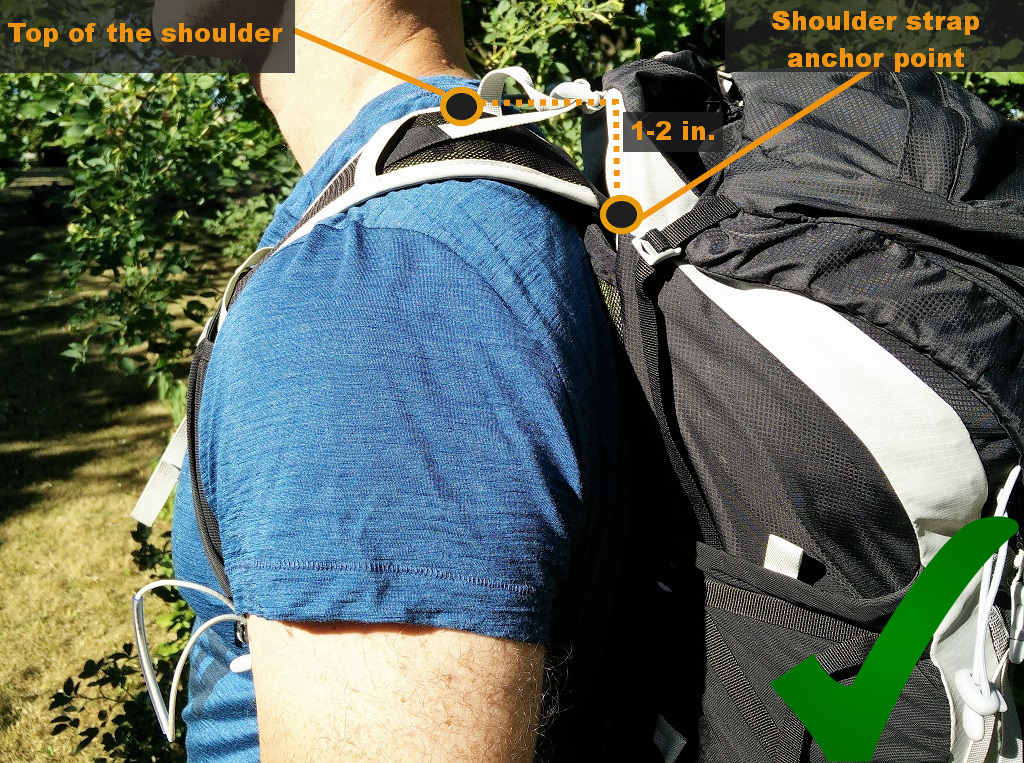
The attachment point where shoulder straps meet the pack should align with your shoulder blades, typically 1-2 inches below the top of your shoulders. If the straps attach too high, they'll dig into your neck; too low, and they'll pull away from your shoulders, creating an unstable carry.
Many packs feature adjustable shoulder strap attachment points or torso length adjustments. If your pack includes these features, adjust them so the shoulder straps follow your shoulder's natural curve without creating gaps or pressure points.
Step 3: Load Lifter Strap Configuration
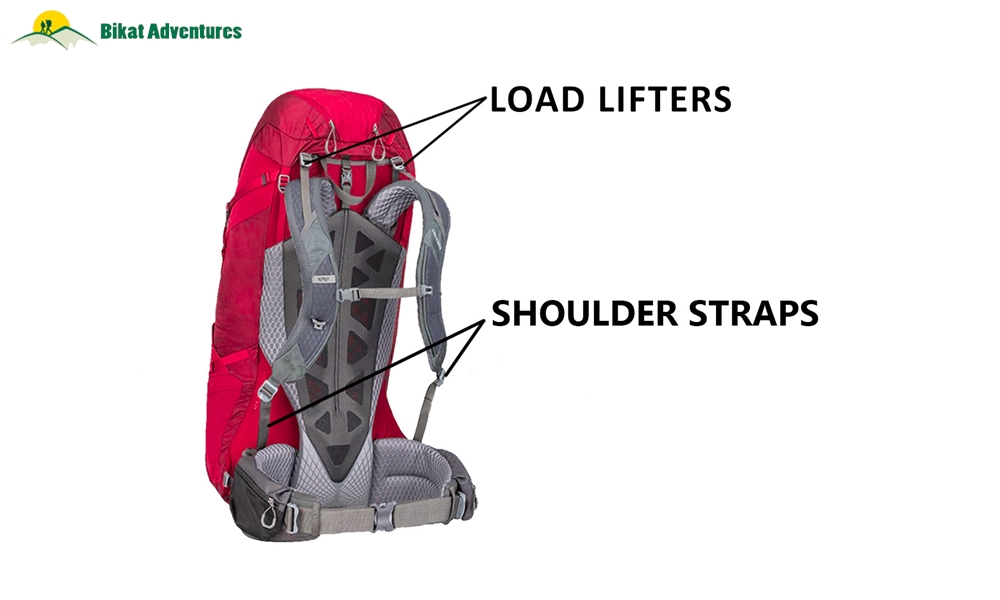
Load lifter straps, positioned at the top of the shoulder straps, help pull the pack's weight closer to your back for improved balance and comfort. These straps should angle upward from the shoulder straps to the pack at approximately 45 degrees when properly adjusted.
Tighten the load lifters until you feel the pack's weight shift closer to your back, but avoid over-tightening, which can create pressure points on your shoulders. When correctly adjusted, load lifters reduce the forward pull of the pack, allowing you to maintain better posture and reducing back strain.
Step 4: Sternum Strap Positioning

The sternum strap connects the two shoulder straps across your chest, providing stability and preventing the straps from sliding outward during movement. Position the sternum strap approximately one inch below your collarbone, avoiding placement directly over the collarbone where it can restrict breathing or create discomfort.
Adjust the sternum strap snugly enough to provide stability without restricting chest expansion for breathing. The strap should feel secure but not tight - you should be able to take deep breaths comfortably throughout your hike.
Many modern packs feature vertically adjustable sternum straps that slide along the shoulder straps, allowing precise positioning for different body types. Take advantage of this adjustability to find the position that provides stability without compromising comfort.
Fine-Tuning for Different Activities
Different hiking activities may require slight adjustment modifications to optimize pack performance for specific demands.
Day Hiking Adjustments
For day hiking with lighter loads, you can typically adjust the pack slightly higher on your back for better mobility and easier access to gear. Day packs often benefit from slightly looser hip belt adjustment since the lighter weight allows more shoulder involvement in load carrying.
Consider your activity level when fine-tuning adjustments. Trail runners and fast hikers may prefer slightly different settings than casual walkers, with emphasis on minimizing bounce and maintaining freedom of movement.
Multi-Day and Expedition Adjustments
Heavier loads in multi-day packs and expedition packs require more precise adjustment and greater reliance on the hip belt for weight distribution. Ensure the hip belt is positioned correctly and tightened adequately to handle increased weight.
With heavier loads, load lifter adjustments become more critical for maintaining proper posture and preventing the pack from pulling you backward. Fine-tune these straps throughout the day as pack weight changes due to food and water consumption.
Specialized Pack Considerations
Hydration packs and lumbar packs require different fitting approaches due to their unique designs. Hydration packs should fit snugly against your back to minimize bouncing during active pursuits, while lumbar packs need secure hip positioning without interfering with natural movement.
Ski and snowboard packs may require adjustment modifications to accommodate winter clothing layers and specialized carrying requirements for winter sports equipment.
Common Fitting Problems and Solutions
Hot Spots and Pressure Points
Hot spots typically develop where the pack makes excessive contact with your body due to poor fit or adjustment. Common locations include the hip bones, shoulders, and lower back. If you experience hot spots during pack fitting, first check that all straps are properly adjusted and the pack is loaded correctly.
Sometimes hot spots indicate incorrect pack sizing - a pack that's too small for your torso will create pressure points, while an oversized pack may shift and rub during movement. Consider pack accessories like additional padding or strap covers if minor hot spots persist after proper adjustment.
Load Distribution Issues
If the pack feels unbalanced or pulls you backward or forward, reassess your packing technique and strap adjustments. Heavy items should be packed close to your back and centered vertically, while load lifter straps help pull the load closer to your center of gravity.
Poor load distribution can also result from incorrect hip belt positioning or inadequate tightening. Ensure the hip belt is carrying the majority of the weight and positioned on your hip bones rather than your waist.
Numbness and Circulation Problems
Numbness in hands, arms, or shoulders typically indicates that shoulder straps are too tight or positioned incorrectly. Remember that shoulder straps should provide stability rather than carry weight - loosen them and ensure the hip belt is properly supporting the load.
Tingling or numbness can also result from sternum strap over-tightening, which restricts circulation or nerve pathways. Adjust the sternum strap for stability without creating excessive pressure.
Maintaining Proper Fit Throughout Your Hike
Pack fit isn't a set-and-forget proposition - proper adjustment requires ongoing attention throughout your hiking day. As you consume food and water, your pack's weight decreases and weight distribution changes, potentially requiring strap readjustments.
Temperature changes affect clothing layers, which can impact pack fit. Adding or removing layers may require hip belt and shoulder strap modifications to maintain optimal fit. Similarly, natural body changes throughout a long hiking day - such as slight swelling or muscle fatigue - may necessitate minor adjustments.
Periodically assess your comfort level and make small adjustments as needed. Most hikers find they need to fine-tune their pack fit 2-3 times during a full day of hiking, particularly when transitioning between different terrain types or activity levels.
Advanced Fitting Considerations
Gender-Specific Fit Requirements
Women's-specific packs address anatomical differences that significantly impact fit and comfort. These packs typically feature shorter torso lengths, more angled shoulder straps, and contouring designed for female hip and chest anatomy. However, body type matters more than gender - some women may find men's packs fit better, and vice versa.
Age-Related Fitting Needs
Kids packs require special attention to weight limits and simplified adjustment systems. Children's strength and endurance differ significantly from adults, making proper fit even more critical for safety and enjoyment.
Older hikers may benefit from packs with easier-to-reach adjustments and additional padding in pressure-sensitive areas. Consider individual mobility and strength limitations when selecting and fitting packs for mature hikers.
Professional Fitting Services and Resources
Many outdoor retailers offer professional pack fitting services, which can be invaluable for first-time buyers or hikers experiencing persistent fit issues. These services typically include torso measurement, pack selection guidance, and hands-on adjustment training.
For additional insights into pack selection beyond fitting, explore our comprehensive guide "Top 5 Features to Look for in a Hiking Backpack," which covers essential pack features that complement proper fit for optimal hiking performance.
Weather protection is another crucial consideration for pack selection and comfort. Our detailed comparison "Waterproof vs. Water-Resistant Backpacks: What You Really Need" helps you understand protection options that keep both you and your gear comfortable in various weather conditions.
Conclusion: Your Path to Hiking Comfort
Proper backpack fit and adjustment form the foundation of comfortable hiking experiences. By following this comprehensive guide and taking time to properly fit your pack, you'll transform your hiking comfort and performance dramatically.
Remember that achieving perfect fit may require patience and experimentation. Every body is unique, and finding your optimal settings may take several hiking trips and minor adjustments along the way. The investment in proper fit pays dividends in comfort, safety, and hiking enjoyment for years to come.
Whether you're selecting your first pack from our urban bags and packs for city adventures or upgrading to a serious expedition pack for major adventures, proper fit remains the key to unlocking your pack's full potential.
At Alpenglow Gear, our extensive selection of hiking and camping packs ensures you'll find the perfect pack for your body type and adventure style. Combined with the fitting knowledge you've gained from this guide, you're well-equipped to make an informed decision that will enhance every trail experience ahead.