Building Your First Trad Rack: Essential Hardware for Traditional Climbing
Traditional (trad) climbing represents one of the purest forms of rock climbing, where you place and remove your own protection as you ascend. Unlike sport climbing with pre-placed bolts, trad climbing requires you to carry a comprehensive rack of gear that will keep you safe on routes ranging from crack climbs to face routes with natural features. For climbers making the transition from sport climbing or gym climbing, assembling your first trad rack can feel overwhelming—both technically and financially.
This comprehensive guide breaks down exactly what hardware you need, why you need it, and how to prioritize your purchases when building a traditional climbing rack that will keep you safe and prepared for a wide variety of routes. Whether you're planning your first trad lead or transitioning from following to leading, understanding the essential components of a trad rack is your first step toward independence on the rock.
Understanding the Purpose of a Trad Rack
Before diving into specific gear, it's important to understand what makes traditional climbing gear different from sport climbing equipment. In trad climbing, you place removable protection into natural rock features—cracks, pockets, constrictions—as you climb. This protection catches you if you fall, similar to sport climbing bolts, but with one critical difference: you must choose, place, and later clean every piece of protection yourself.
This means your trad rack must be:
- Comprehensive: Covering a wide range of crack sizes and rock features
- Redundant: Multiple pieces in commonly used sizes
- Reliable: High-quality gear from trusted manufacturers
- Properly organized: Allowing quick access when you need specific pieces
- Appropriate for your objectives: Matched to the routes and areas you'll climb
A well-built trad rack gives you the confidence to lead routes safely while providing the versatility to protect various types of rock features you'll encounter.
The Essential Components of a First Trad Rack
Active Protection: Camming Devices
Camming devices (cams or spring-loaded camming devices/SLCDs) are the workhorse of modern trad climbing. These ingenious pieces of gear use spring-loaded cam lobes that expand against the walls of a crack, creating friction that holds falls.
Why Cams Are Essential: Cams are fast to place, work in parallel-sided cracks, provide multi-directional protection, and inspire confidence with their positive, tactile placement. For first-time trad climbers, cams are often easier to place correctly than passive protection.
Recommended Starter Cam Set:
- One each in sizes: 0.3, 0.4, 0.5, 0.75, 1, 2, 3 (approximate Black Diamond C4 sizing)
- This covers crack sizes from approximately 0.5 inches to 4 inches
- Popular options: Black Diamond Camalot C4, DMM Dragon, Wild Country Friend
For your first rack, focus on the middle sizes (0.5 to 2) where you'll place most of your protection. As you gain experience and encounter specific route requirements, you can add smaller micro-cams (0.1, 0.2) and larger pieces (4, 5, 6) to expand your range.
Budget-Conscious Tip: Start with mid-range sizes and double up on the most common placements (#0.5, #0.75, #1) rather than buying the complete size range immediately. You can often rent or borrow specialty sizes like #4 and #5 for routes that specifically require them.
The Alpenglow climbing hardware collection offers cam sets from Black Diamond Camalot C4 ($94.95), DMM Dragon and DragonFly models, Wild Country Friends ($79.95), and Metolius Supercam ($79.95), giving you options across various price points and cam designs.
Passive Protection: Nuts and Stoppers
Nuts (also called stoppers or chocks) are wedge-shaped pieces of metal attached to wire cables. You place them in constrictions within cracks where their tapered shape creates a secure placement. Despite being the oldest form of climbing protection, nuts remain essential for several reasons:
Why Nuts Are Essential: Nuts are lightweight, inexpensive, versatile in various crack types, bomber when well-placed, and work in placements where cams won't fit—particularly narrow constrictions and shallow placements behind flakes.
Recommended Starter Nut Set:
- A complete set of nuts in sizes #1-13 (typically sold as a set)
- Popular options: Black Diamond Stoppers, DMM Wallnuts, Wild Country Rocks
- Cost: $110-145 for a complete set
A standard set of nuts provides 10-13 pieces covering a wide range of crack sizes. Unlike cams where you might double up on popular sizes, a single set of nuts is usually sufficient for getting started, as you can typically find multiple placement options on most routes.
Pro Tip: Add offset nuts (like Black Diamond Offset Stoppers or Wild Country Offset Rocks) after you're comfortable with standard nuts. Offsets work in pin scars, flaring cracks, and irregular features where standard nuts won't seat properly.
Specialty Passive Protection: Hexes and Tri-Cams
After acquiring cams and nuts, you'll eventually want to add some specialty passive pieces that fill specific niches:
Hexentrics (Hexes): Six-sided passive protection that works in wider cracks through camming action or slotting. Hexes are inexpensive protection for larger crack sizes, making them an economical alternative to large cams.
Tri-Cams: Unique passive/active hybrid protection that works through camming action without springs. Tri-Cams excel in horizontal cracks, pin scars, and limestone pockets. CAMP Tri-Cams are popular options available starting at $29.95.
For your first rack, hexes and Tri-Cams are optional—focus on cams and nuts first. However, many climbers find that a few Tri-Cams (sizes 0.5, 1.0, 1.5) add valuable versatility without significant weight or cost.
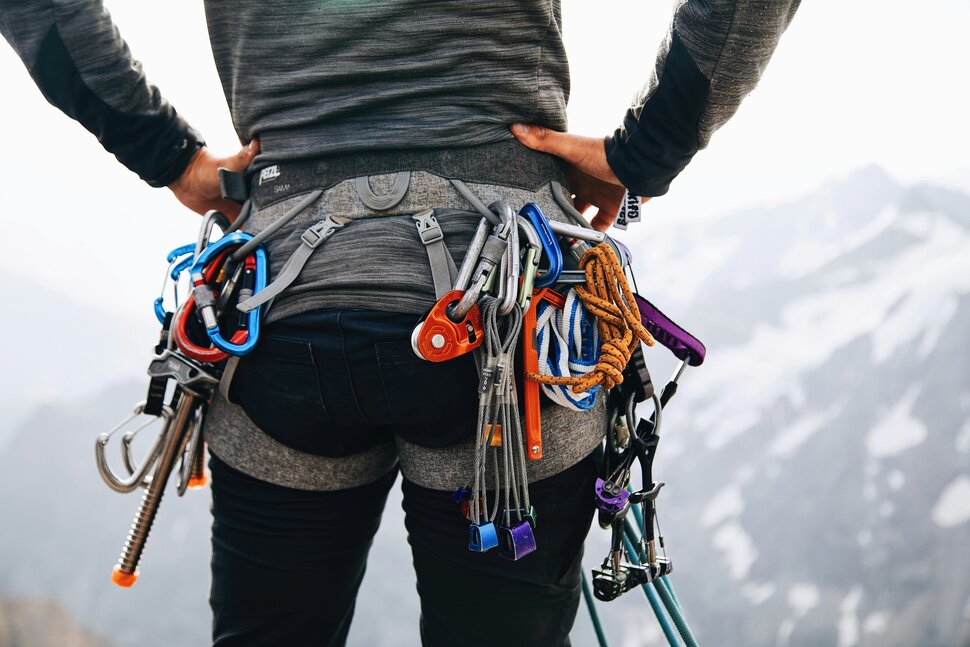
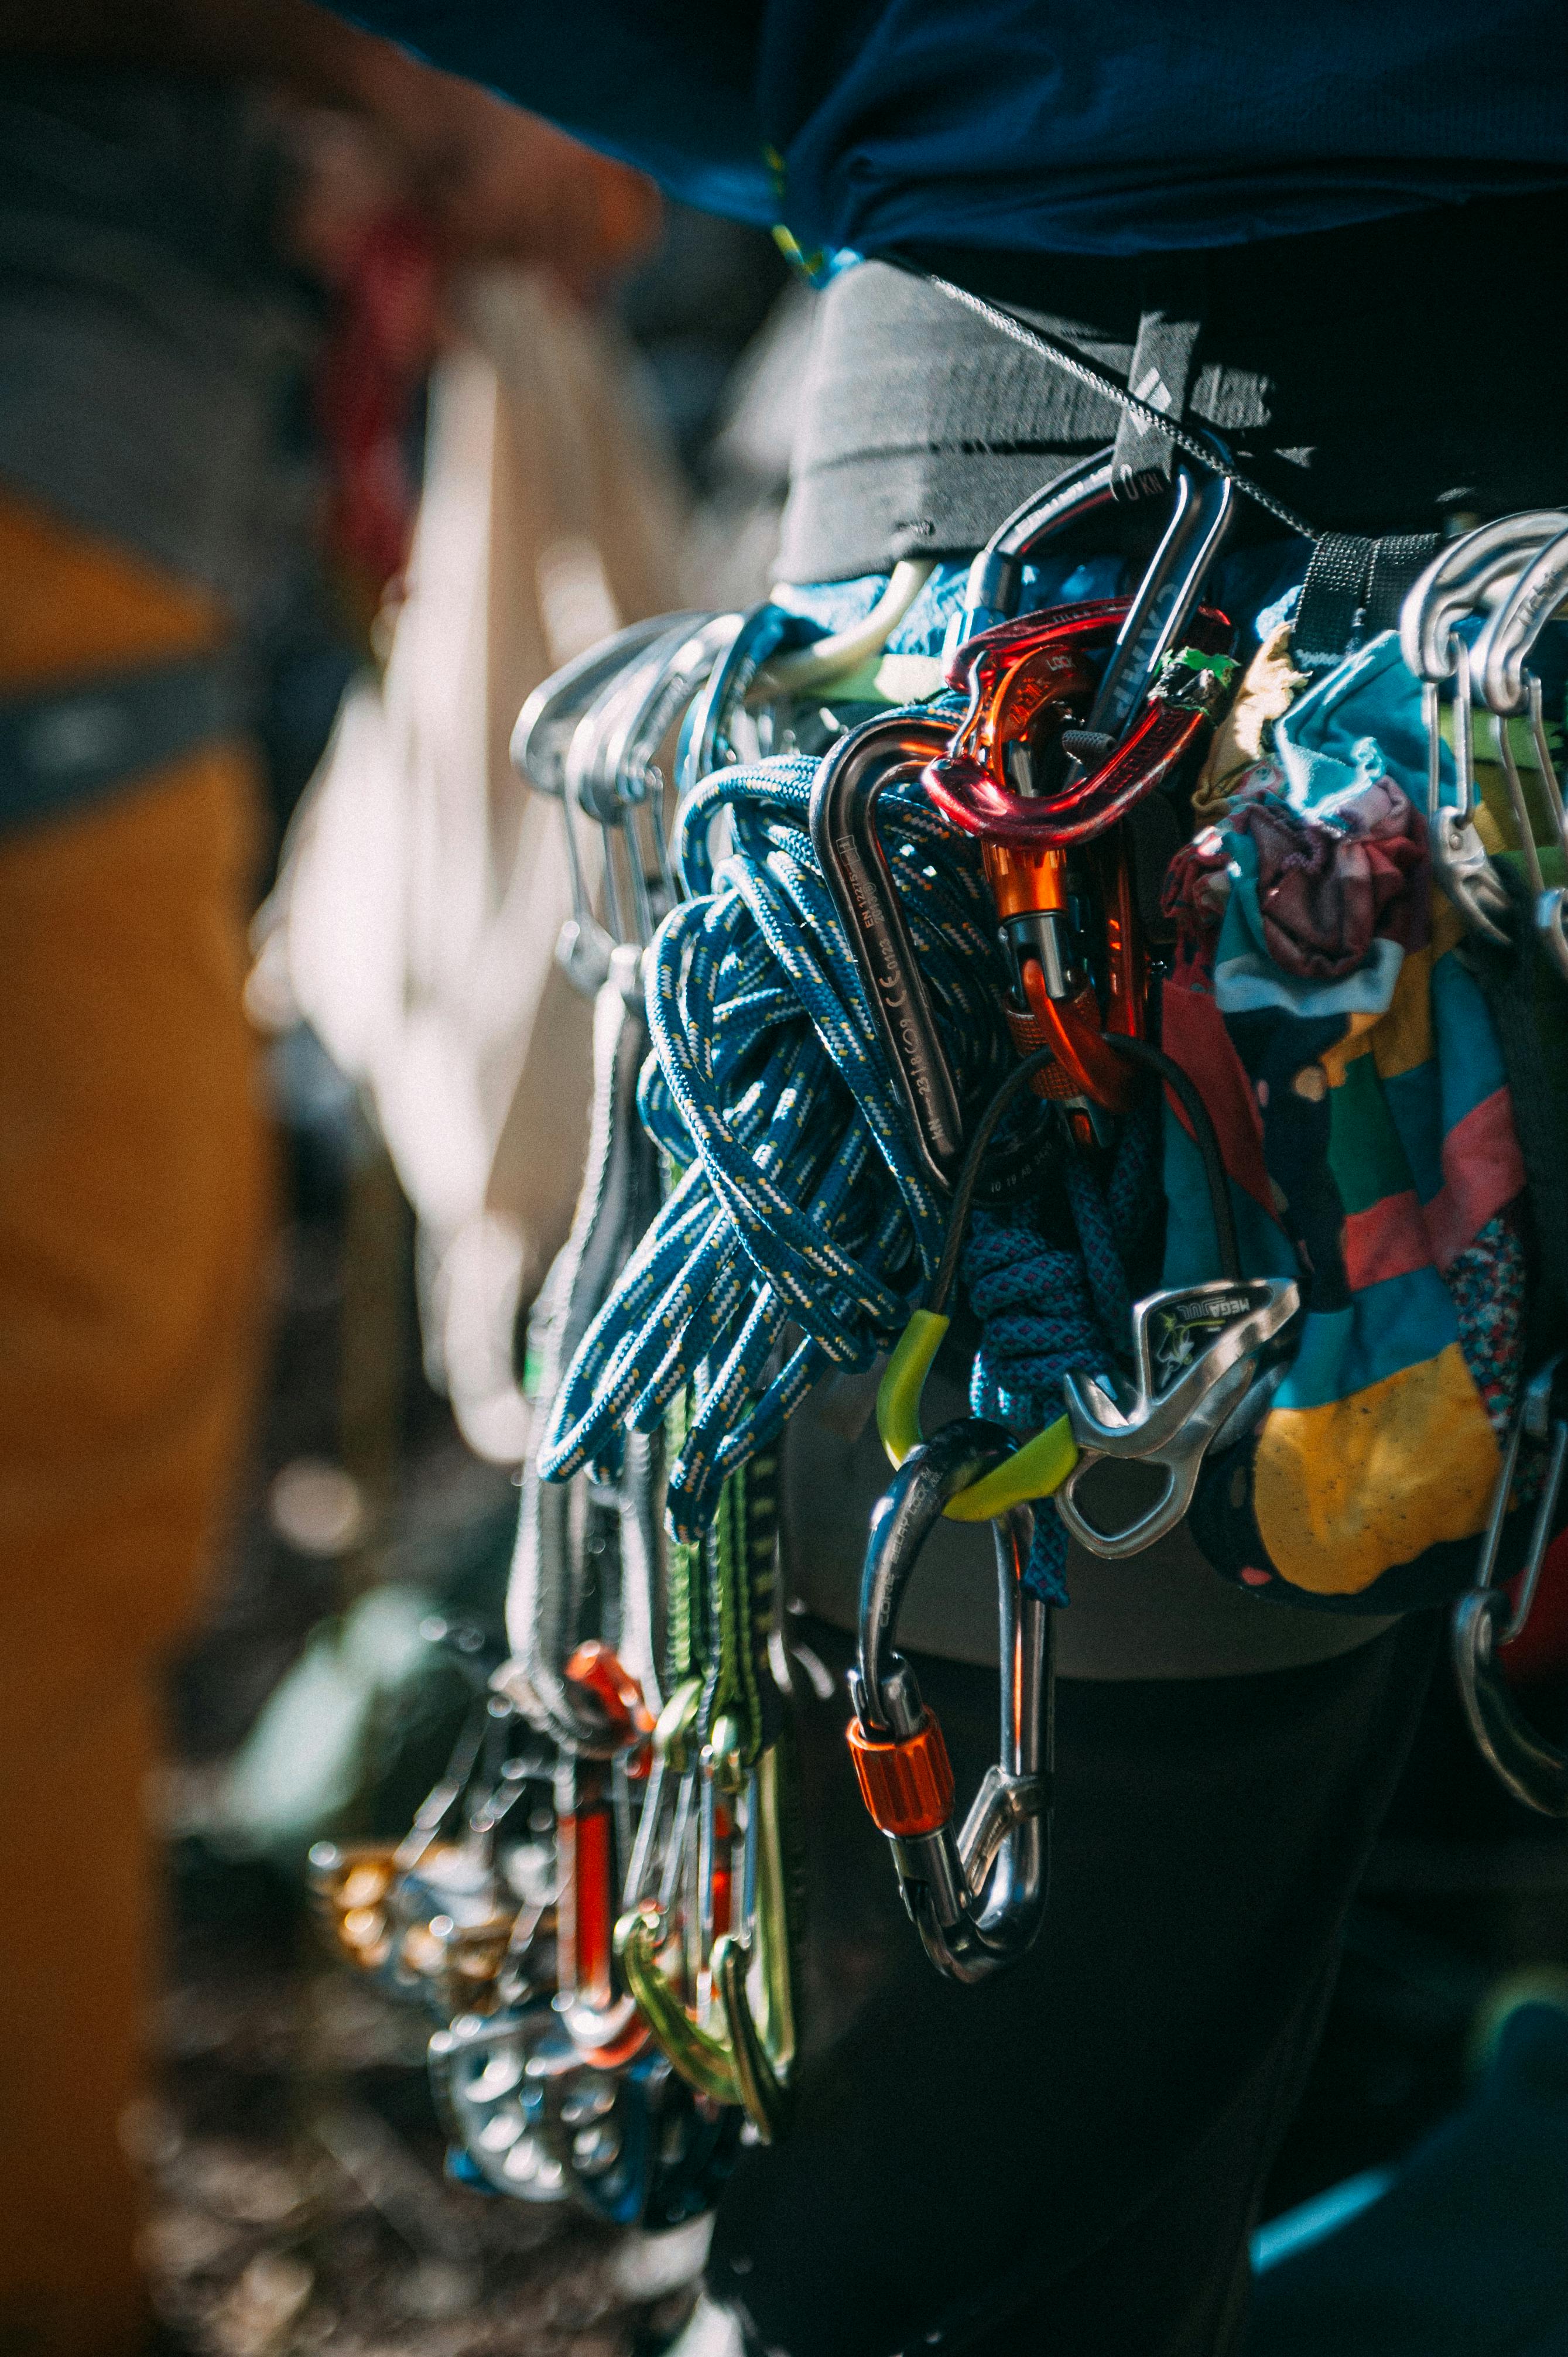
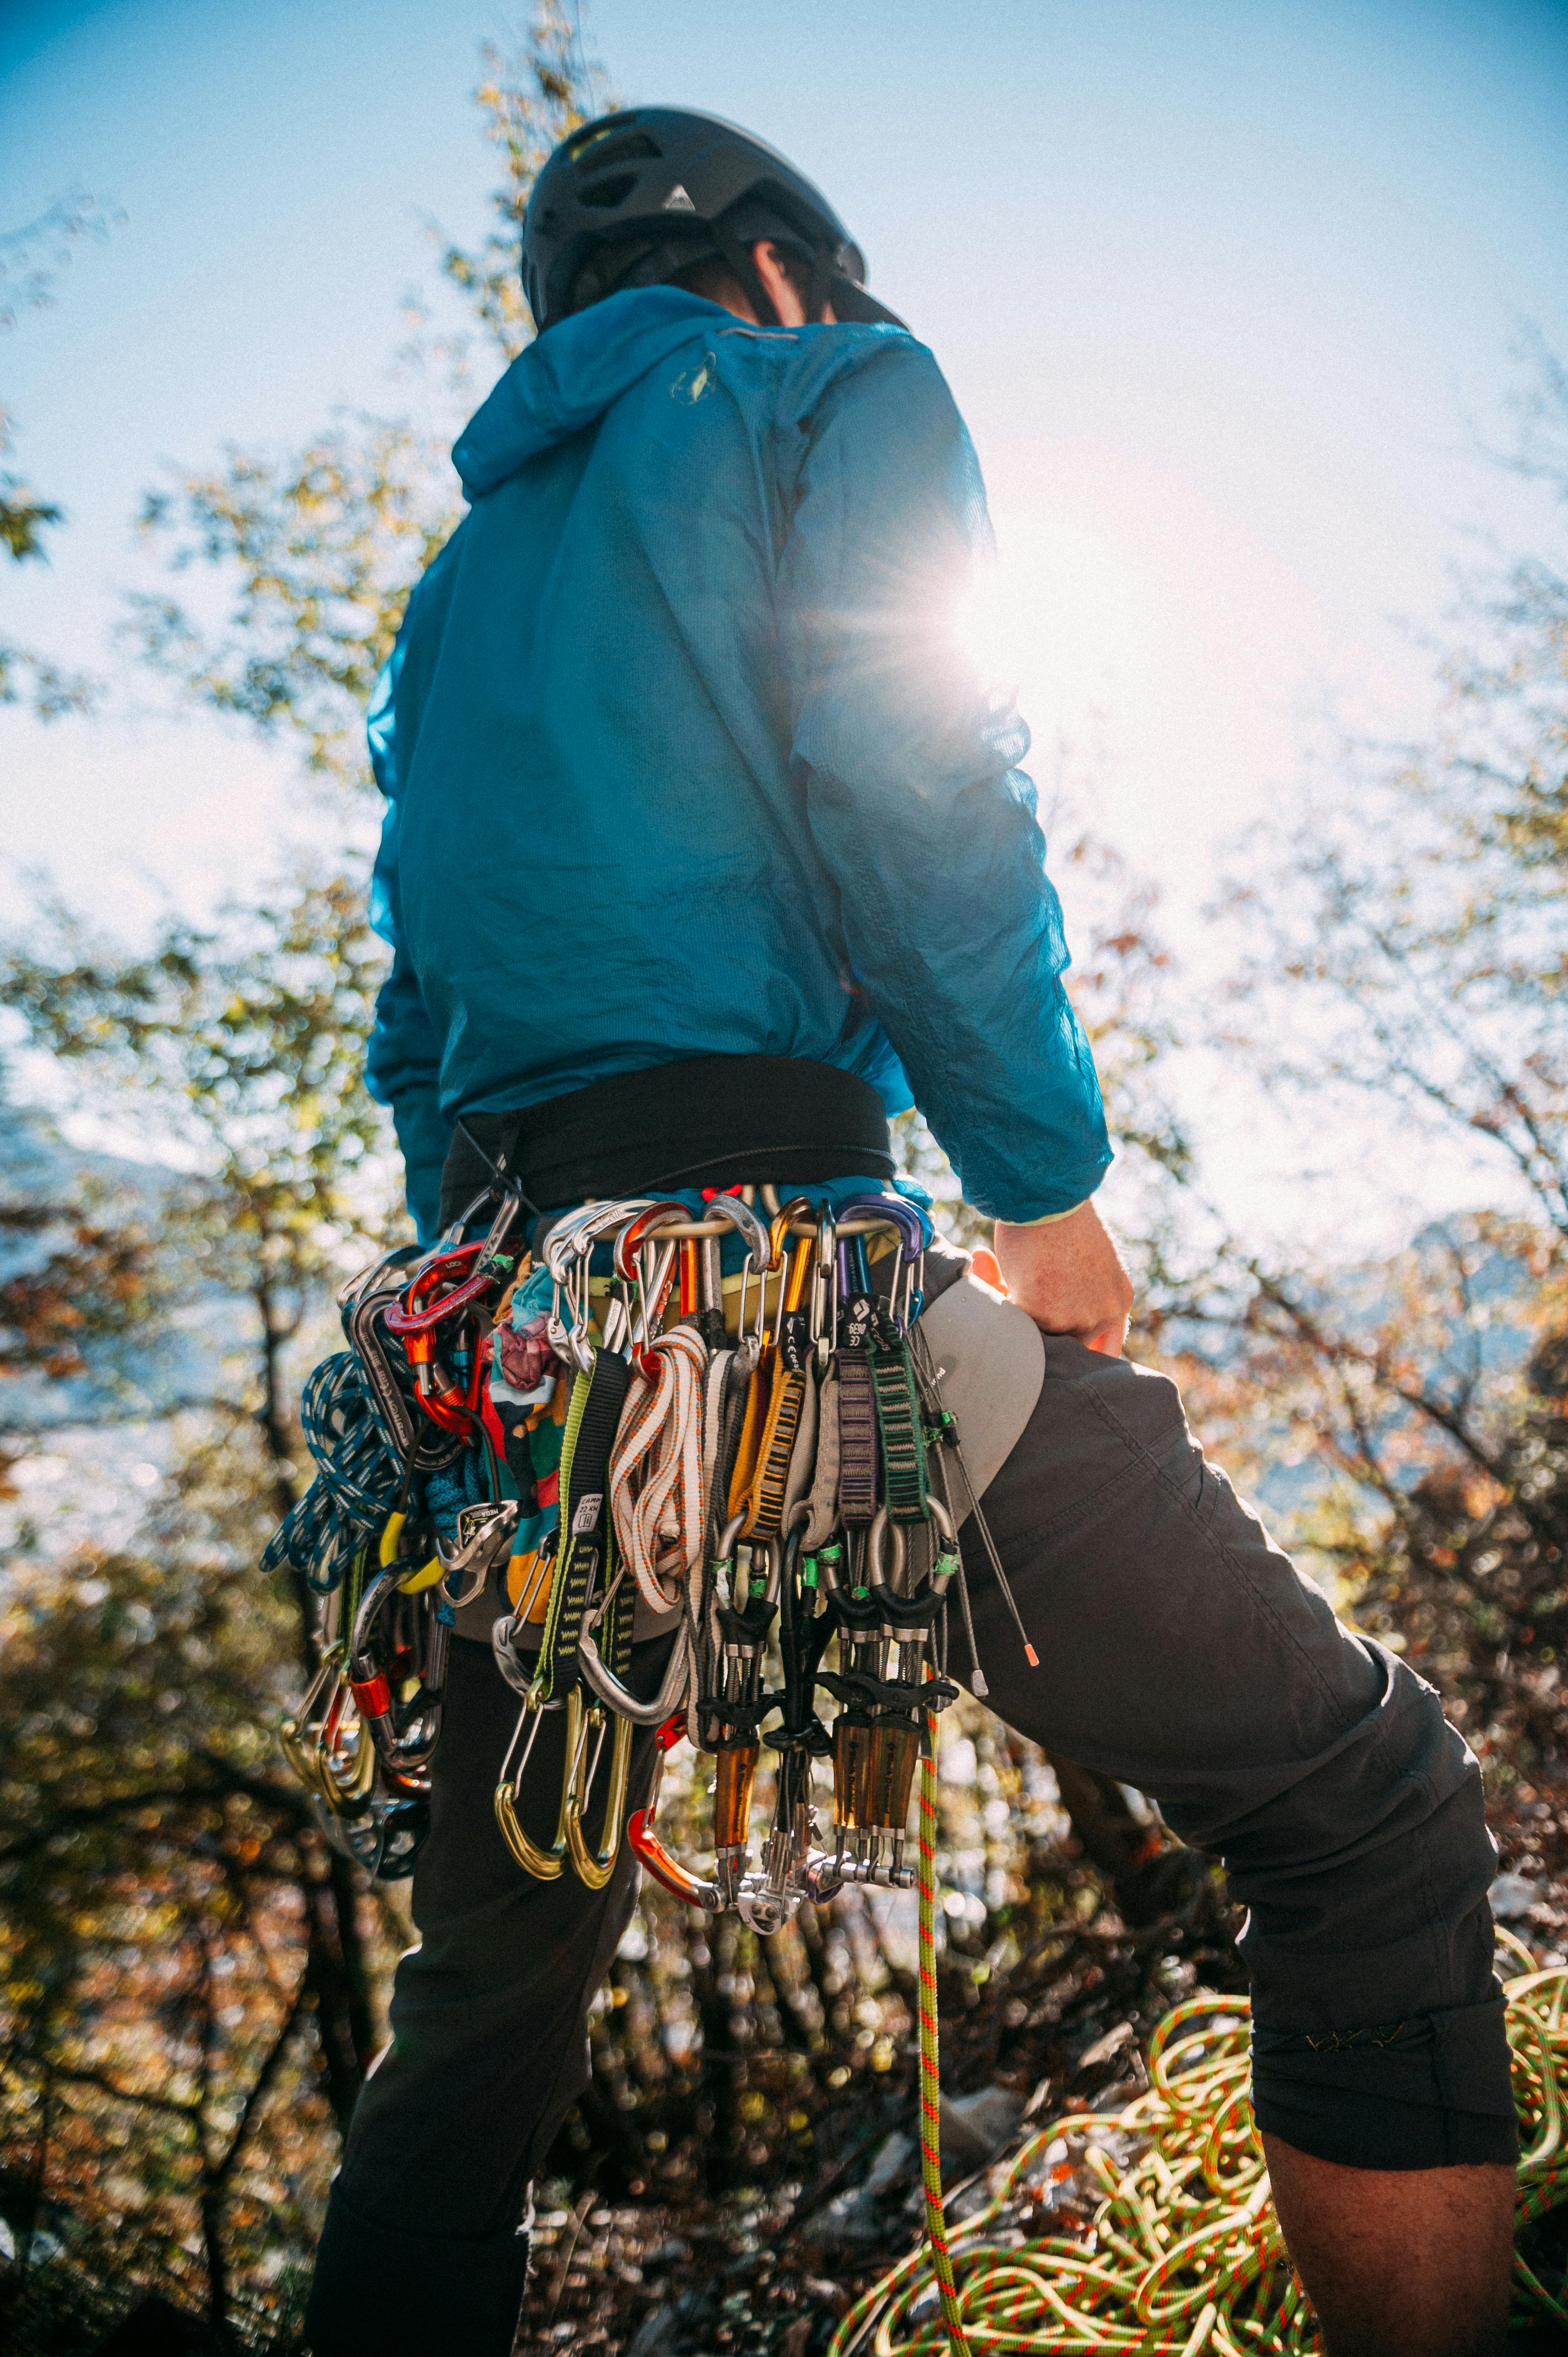
Carabiners: Your Connection System

Carabiners connect every piece of protection to your rope through quickdraws or alpine draws. For trad climbing, you'll need significantly more carabiners than sport climbing.
Racking Carabiners
Quantity Needed: 15-20 non-locking carabiners
Best Type: Wiregate carabiners for weight savings and cold-weather performance
Popular Options: Black Diamond MINIWIRE ($6.95), DMM Spectre 2 ($9.95), Petzl Ange, CAMP Nano 22
These carabiners attach to your gear loops, allowing you to rack your cams and nuts on your harness. Wiregate designs are ideal because they're lightweight, don't ice up in alpine conditions, and clip smoothly without snagging.
Quickdraws and Alpine Draws
Quickdraws (6-10): Pre-sewn quickdraws with carabiners on both ends work well for straightforward protection placements and direct falls.
Alpine Draws (4-8): Extendable slings with carabiners on each end reduce rope drag on wandering routes. You can make these yourself with 60cm or 120cm nylon or Dyneema slings and additional wiregate carabiners.
Pro Tip: Alpine draws are more versatile than standard quickdraws for trad climbing because they extend to reduce rope drag, equalize gear placements, and function as standard quickdraws when racked short.
Locking Carabiners
Quantity Needed: 4-6 locking carabiners
Uses: Belaying, building anchors, personal tethers
Popular Options: Petzl Attache ($25.95), DMM Shadow, Black Diamond RockLock
At least two HMS (pear-shaped) locking carabiners are essential for belaying and rappelling. Additional locking biners help build anchors and create personal anchor systems for safety at belay stations.
Slings and Cord: Extension and Equalization

Slings (also called runners) are loops of webbing used to extend protection placements, build anchors, and reduce rope drag.
Recommended Slings:
- 4-6 shoulder-length (60cm) slings
- 2-3 double-length (120cm) slings
- Material: Nylon or Dyneema (Dyneema is lighter, nylon has more elasticity)
Cordelette: One 18-20 foot section of 7mm or 8mm nylon cord for building equalized anchors. Many climbers tie this into a loop using a double fisherman's knot.
Slings allow you to extend protection away from the rock face, reducing rope drag on wandering routes and keeping carabiners oriented properly. They're also essential for building safe, equalized anchor systems at the top of pitches.
Belay and Rappel Devices
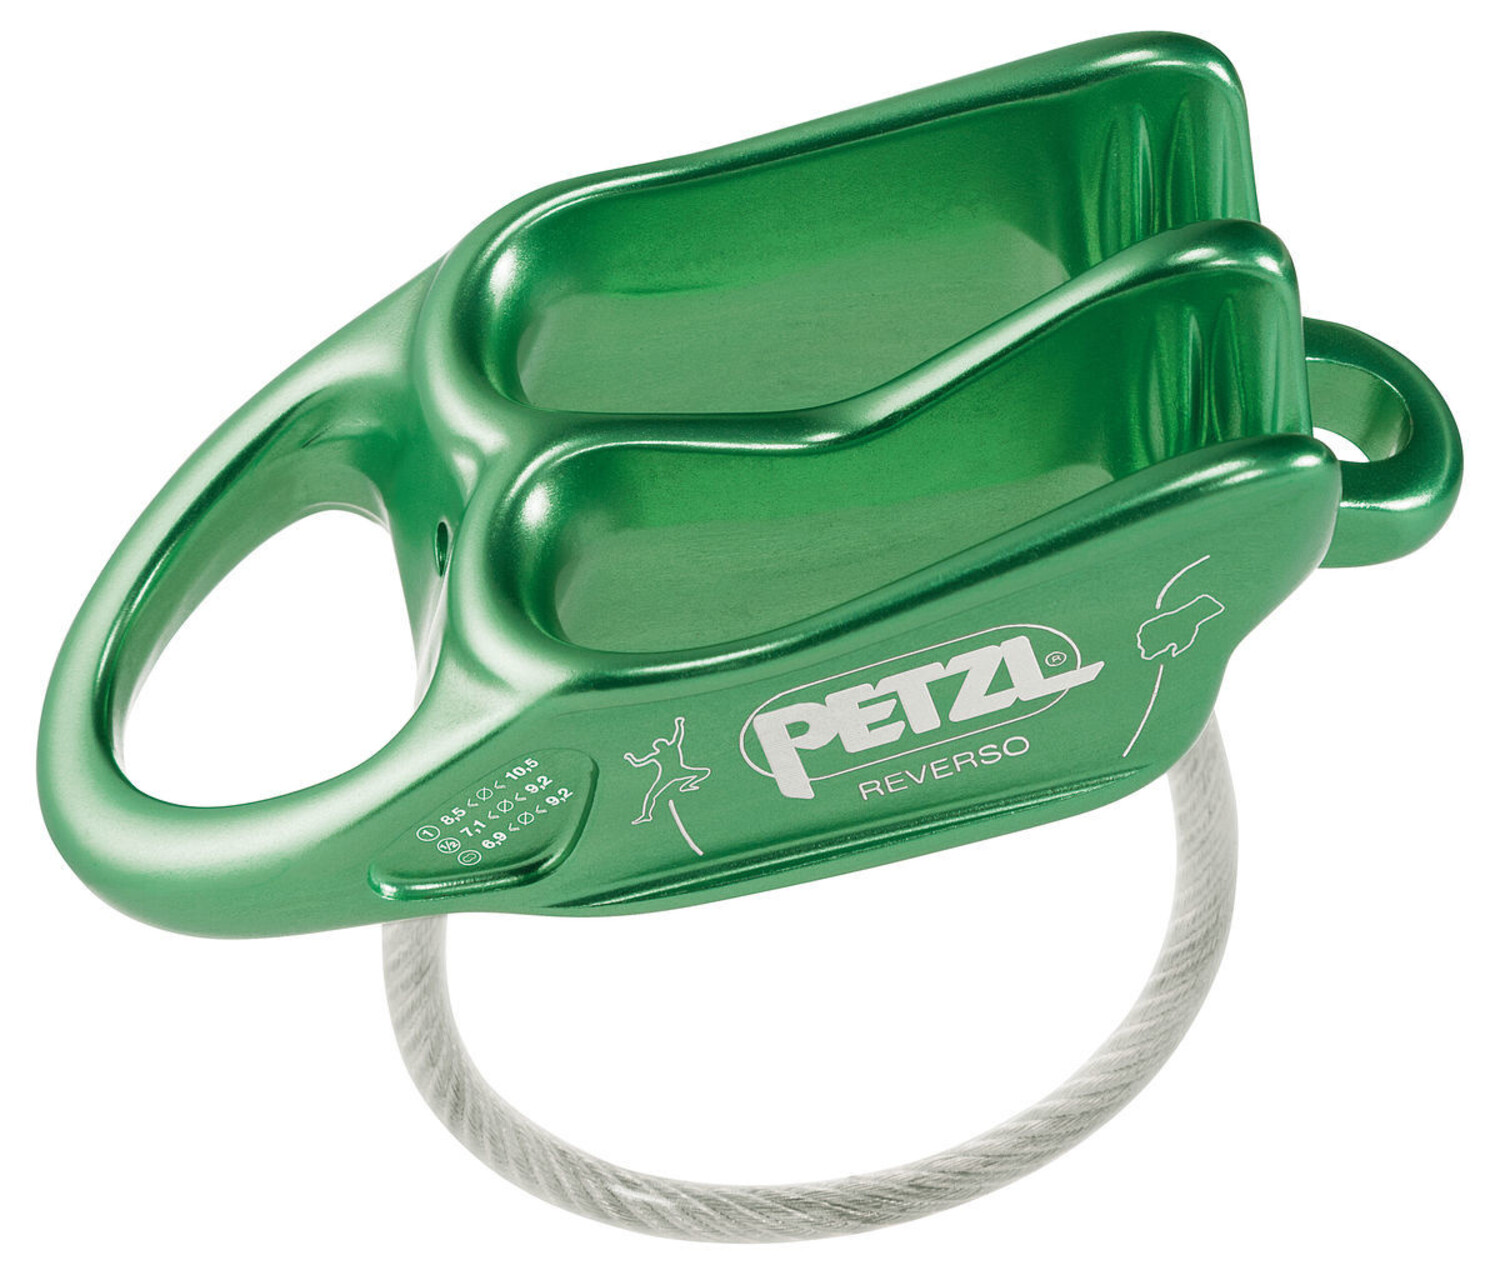
Your sport climbing belay device will work fine for trad climbing, but if you're planning multi-pitch routes, consider an advanced belay device with guide mode capability.
Recommended Devices:
- Tube-Style: Black Diamond ATC-Guide ($34.95), Petzl Reverso ($39.95)
- Assisted-Braking: Petzl Grigri ($109.95), Petzl Neox ($165.00)
Guide-mode capable devices allow you to belay from above when bringing up a second climber, essential for multi-pitch traditional routes. Assisted-braking devices like the Grigri provide extra security but are heavier and more expensive.
Essential Accessories
Nut Tool
A nut tool is absolutely essential for cleaning passive protection. The metal blade slides behind stuck nuts, allowing you to tap them loose after your partner has weighted and set them during the climb.
Recommended: DMM Nutbuster ($14.95), Wild Country Pro Key, Metolius Feather Nut
Pro Tip: Attach your nut tool to your harness with a short leash so it's always accessible when you need it.
Chalk Bag and Brush
While not hardware, don't underestimate the importance of a chalk bag for maintaining friction on your hands, especially on long trad routes where you're placing gear frequently and handling metal equipment.
Sample Starter Trad Rack: The Essentials
Here's a practical starter rack that will prepare you for moderate trad routes (5.6-5.9) in most climbing areas:
Active Protection:
- 1x cams in sizes: 0.3, 0.4, 0.5, 0.75, 1, 2, 3
- Total: 7 cams
Passive Protection:
- 1x complete set of nuts (#1-13)
- Total: 1 set (10-13 pieces)
Carabiners:
- 15x wiregate non-locking carabiners (for racking gear)
- 8x additional wiregate biners (for quickdraws/alpine draws)
- 4x locking carabiners (HMS-style for belay and anchors)
Slings and Cord:
- 4x 60cm slings
- 2x 120cm slings
- 1x 18-20' cordelette
Other:
- 1x nut tool
- 1x belay device with guide mode
- Chalk bag
Approximate Cost: $1,200-1,600 depending on brands chosen
This rack provides comprehensive coverage for typical trad routes and can be expanded as you progress to harder grades and specialized route types.
Building Your Rack Progressively: A Smart Approach
Unless you have unlimited funds, most climbers build their trad rack gradually. Here's a strategic progression:
Phase 1: Foundation ($400-600)
- Complete set of nuts
- 3-4 cams in middle sizes (#0.5, 0.75, 1, 2)
- 10 wiregate racking carabiners
- 2 locking carabiners
- 4 slings (60cm)
- Nut tool
With this foundation, you can start following trad routes and potentially lead easier routes where you can supplement with borrowed gear or place protection conservatively.
Phase 2: Core Rack ($600-800)
- Add 3 more cams (0.3, 0.4, 3)
- Add 8 wiregate carabiners for quickdraws
- Add 2 more locking carabiners
- Add 2 double-length (120cm) slings
- Cordelette
This completes your basic rack for leading moderate trad routes independently.
Phase 3: Duplication and Specialization ($400-600)
- Double up on most-used cam sizes (#0.5, 0.75, 1)
- Add offset nuts
- Add 1-2 Tri-Cams
- Add larger cam (#4)
- Additional carabiners and slings as needed
Now you have a complete, versatile rack for a wide range of routes and climbing styles.
Organizing Your Trad Rack
Proper gear organization makes a huge difference in your efficiency and safety on trad routes. Here's how experienced climbers typically rack their gear:
Gear Loops: Most harnesses have 4 gear loops. A common system:
- Front left: Small to medium cams (0.3-1)
- Front right: Nuts and small passive gear
- Back left: Large cams (2-4) and Tri-Cams
- Back right: Quickdraws and slings
Carabiner Orientation: Rack gear with carabiner gates facing the same direction and opening toward your body for easy removal.
Color Coding: Modern cams use color-coded systems (Black Diamond Camalots, DMM Dragons) that help you quickly identify sizes at a glance.
Practice at Ground Level: Before heading out on routes, practice racking and unracking your gear at home or the crag. Muscle memory makes gear selection faster when you're pumped on a route.
Choosing Brands: Quality vs. Budget
Alpenglow's climbing and technical hardware selection includes gear from all the major trusted brands: Black Diamond, Petzl, DMM, Wild Country, CAMP, Metolius, and OCUN. Here's how to think about brand selection:
Premium Brands: Black Diamond, DMM, Wild Country, and Petzl have established reputations for quality and innovation. Their gear costs more but offers refinements in weight, durability, and ease of use.
Value Brands: CAMP, Metolius, and OCUN offer excellent quality at lower price points, making them smart choices for budget-conscious climbers building their first rack.
Mix and Match: Many experienced climbers use premium cams where performance matters most (frequently used sizes) and value options for less-common sizes or passive gear.
Most Important: Buy from authorized retailers (like Alpenglow) to ensure you're getting genuine gear with manufacturer warranties. Counterfeit climbing gear exists and can be deadly.
Maintaining and Inspecting Your Rack
Traditional climbing gear takes significant abuse from rock contact, falls, and general use. Proper maintenance extends its lifespan and keeps you safe:
After Every Climbing Day:
- Brush off dirt, chalk, and debris
- Check cam triggers for smooth action
- Inspect slings and webbing for fraying or cuts
- Look for burrs on carabiner gates
Monthly (for frequent climbers):
- Deep clean cams with warm water and mild soap if they're gritty
- Lubricate cam axles with dry lubricant if they're sticky
- Inspect wire cables on nuts for kinks or fraying
Annually:
- Comprehensive gear inspection
- Replace worn slings (Dyneema every 3-5 years, nylon every 5-7 years)
- Retire gear that's taken hard falls or shows significant wear
Retirement Criteria: Retire any piece with visible damage, cracks, excessive wear, or that's been involved in a serious fall. When in doubt, retire it—your life isn't worth saving $80 on a cam.
Learning to Use Your Rack: Education Is Essential
Owning a trad rack doesn't automatically make you a trad climber. Proper education is critical for safety:
Take a Course: Consider a trad climbing course from organizations like AMGA-certified guides. These courses teach placement techniques, anchor building, risk assessment, and rescue skills.
Find a Mentor: Climb with experienced trad climbers who can demonstrate proper techniques and decision-making in real-world situations.
Practice Ground School: Set up a practice area where you can place and evaluate gear without risk, learning to recognize good versus poor placements.
Start Conservative: Begin with routes well below your sport climbing grade. A 5.10 sport climber might start leading 5.6-5.7 trad routes until gear placement becomes second nature.
Read and Study: Books like "Traditional Lead Climbing" by Heidi Pesterfield and "Climbing Anchors" by John Long provide essential knowledge.
Regional Considerations
Different climbing areas require different rack configurations:
Granite Cracks (Yosemite, Index, Squamish): Emphasis on cams in all sizes, fewer nuts needed
Sandstone (Red Rocks, Indian Creek): Wide crack specialists need larger cams (#3-6), cam doubles essential
Limestone (Red River Gorge, Shelf Road): Tri-Cams excel in pockets, smaller gear for thin cracks
Alpine (Cascades, Rockies): Lightweight rack, emphasis on versatility, weather-resistant features
Research your local area or destination to understand what gear is most commonly used, then tailor your rack accordingly.
Beyond the Basics: Growing Your Rack
Once you have the essentials and are comfortably leading moderate trad routes, you can expand your rack based on your objectives:
For Harder Routes: Micro-cams (0.1, 0.2), offset nuts, more doubles in commonly used sizes
For Wide Cracks: Large cams (#4, 5, 6), big hexes
For Alpine Climbing: Ultralight cams (Black Diamond Camalot Ultralight $109.95), Dyneema slings, lightweight carabiners
For Aid Climbing: Copperheads, hooks, aiders, more specialized gear
Your Journey into Traditional Climbing Starts Here
Building your first trad rack is a significant investment—both financially and in terms of learning—but it opens up an entirely new dimension of climbing. The freedom to choose your own route, the satisfaction of placing solid protection, and the adventure of climbing in remote areas where bolts don't exist makes traditional climbing uniquely rewarding.
Start with the essentials outlined in this guide, supplement with education and mentorship, and build your rack progressively as your skills develop. Every piece of gear you add to your rack expands your capabilities and opens new climbing possibilities.
Ready to build your trad rack? Explore Alpenglow's comprehensive selection of climbing and technical hardware, featuring everything you need from Black Diamond Camalot cams and DMM protection to carabiners, slings, and belay devices. With over 90 products from the industry's most trusted brands, Alpenglow provides the gear that will keep you safe on your traditional climbing journey.
The rock is waiting—build your rack, find a mentor, and discover why traditional climbing has captivated generations of climbers. Your first trad lead awaits.